Service Setup with One-Click Environment Creation
BuildPiper enables quick and hassle-free onboarding of microservices with standardized conventions across multi/hybrid cloud Kubernetes infrastructure. It does all this with complete authentication and access granularity.
Here is a detailed step-by-step process to explain how can you create a Service and associate it with an environment.
- Onboard a Service
- Choose an environment for your Service
Service Onboarding & its association with the environment and Environment Creation can also be done via BPCTL. For more information, please refer to BPCTL Documentation.(Coming Soon)
Onboard a Service#
Service onboarding with BuildPiper is an extremely easy and seamless process involving just a few clicks. Here is how you can onboard a service through the BuildPiper UI.
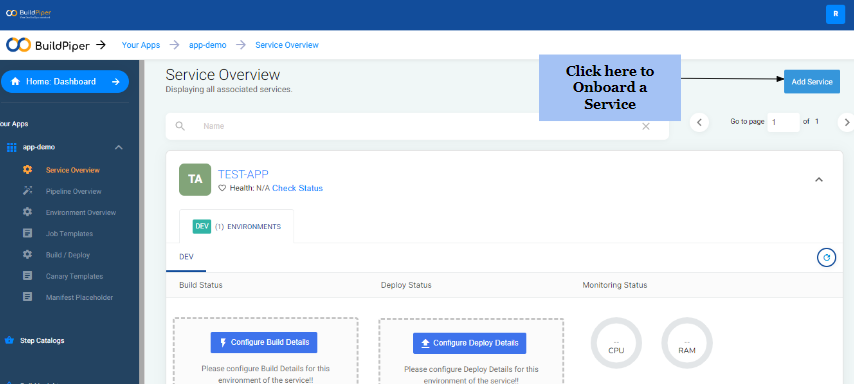
Sign in to the User Portal ->Central Dashboard ->Service Overview Page.
Click on “Add Service” to create a service.
- Clicking on Add service takes you to this screen.
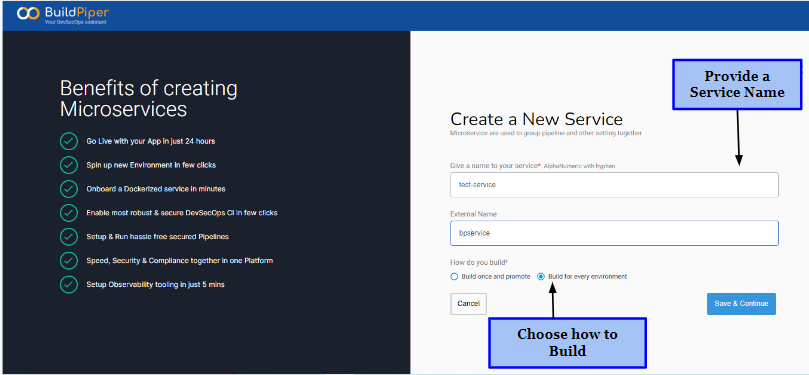
Provide a specific name for the service. The name should contain alphanumeric characters with the hyphen ‘-’. For eg: The service name here is: “test-service”.
Give an external name for the service. External name is the name by which the service is referred to as, in external systems such as Jira. Eg: The name here is: “bpservice”.
Once you’ve named the service, you have two options to build,
- Build Once and Promote
- Build for every environment
To read in detail about the above two features, please refer to the Service Glossary section.
- Finally, click on Save and Continue to switch to the next screen.
Associate Service with an Environment#
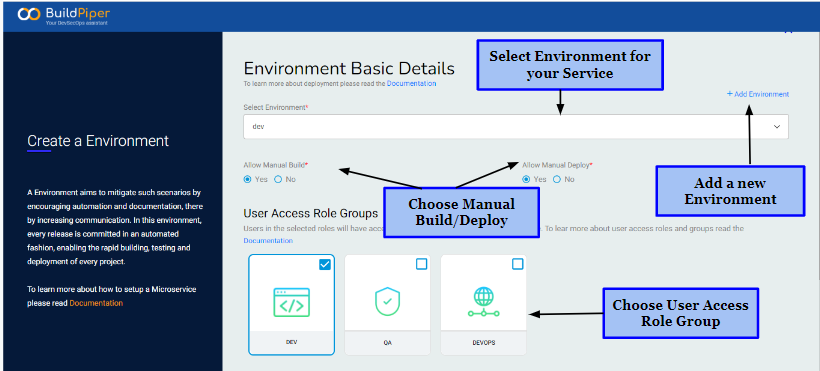
Once the service is created, a workspace is required where technology teams can work on these services. So, clearly, to set up or onboard a Service, there is a need for an environment.
This environment can be considered a workspace where teams can build and deploy these services. Also, they can specify & restrict access to the services for a particular user group role like Dev, QA and DevOps.
So, once you’ve created the Service, here’s how you can associate your service with it.
- Select an Environment.
- Choose 'Yes' if you want to allow a Manual Build/Deploy else choose 'No'.
To read in detail about Manual Build & Deploy, please refer to the Service Glossary section.
- Choose the User group role access from these options,
- Dev
- QA
- DevOps
The users in the selected roles will have access to build and deploy all services in different environments.
For instance, if you choose Dev, then only people who have Dev role assigned to them, will be permitted to access, build and deploy the Services associated with this environment. Similarly, For QA: The people who have QA role assigned to them, will be permitted to access, build and deploy the services associated with this environment.
- Select a pre-configured, customizable Job template comprising different Jobs and Steps related to the service.
Job Templates consist of the CI rules and CD checks for build and deployment of a service. These conventions are executed via the creation of Jobs & Steps within a Job Template. For more information, please refer to our Documentation on Job Template.
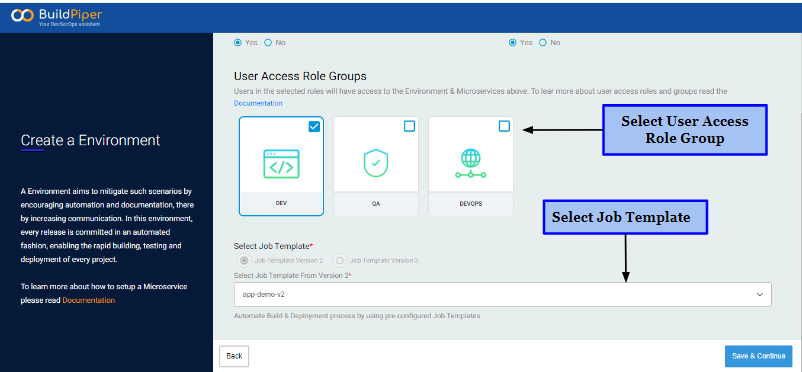
- Finally, click on Save & Continue to move further for configuring the Build details for building the Docker image of the service and Deploy details to enable seamless deployment of Microservices.